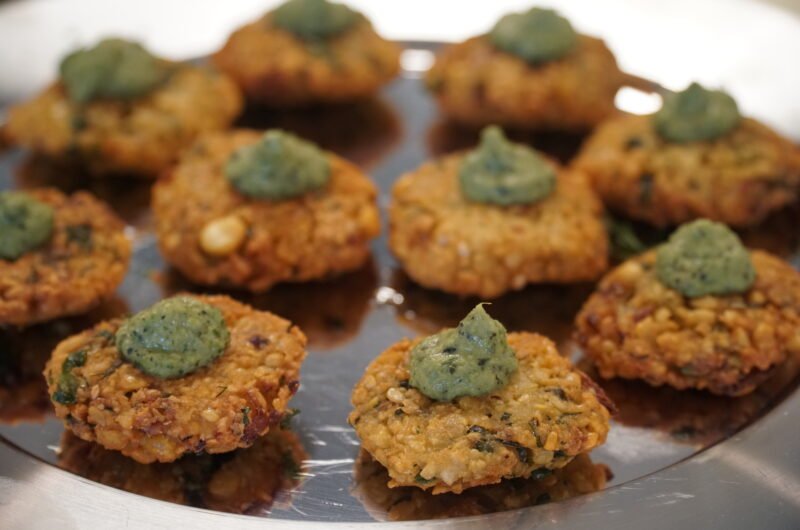
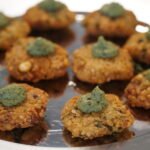
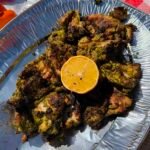
There is nothing quite like a piping-hot masala vada fresh out of the frying oil. Growing up, this was a snack we never actually made in my home and had mostly outside, and I wasn’t really a big fan. But the very first time I tasted this specific version at my husband’s house, I was completely hooked. This is my mother-in-law’s recipe. Back in Mangalore, we call our local version chattambade, but this particular recipe is her Bangalore style. Thanks to her secret addition of moong dal, it turns out incredibly soft and fluffy on the inside and crispy on the inside—a beautiful contrast that you won’t find in standard recipes, which usually only use chana dal.

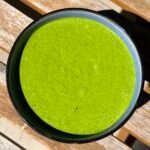
While the core recipe belongs to my mother-in-law, adding fresh mint leaves to the mix is my personal touch because I absolutely love that burst of fresh flavor against the warm spices. She makes these vadas quite frequently, either as a comforting evening snack with tea or as a side to a simple dinner of hot rice and dal.
If you’ve ever felt intimidated by making these vadas, don’t be! This post will help you completely understand the hidden tricks behind making them. Honestly, the very first time I ever attempted this recipe, it turned out absolutely perfect—so I know you can do it too! The entire trick lies simply in the way you grind the dals to achieve the correct consistency, which I am going to walk you through step-by-step in the sections below.
Craving more of my family’s favorite South Indian dishes? Check out my Mom’s Kori Gassi
The Secret to the Ultimate Masala Vada Crunch
Many recipes out there claim to be simple but leave out the tiny technical details that actually make or break your vada’s texture. A truly spectacular masala vada needs to shatter when you bite into it, while remaining light, fluffy, and aromatic on the inside.
The biggest secret? I never add a single drop of water during the grinding process. I aim for a final texture that feels exactly like coarse wet sand.
Ingredients You’ll Need
Don’t let the ingredient list intimidate you—if you love Indian cooking, most of these are likely sitting in your pantry right now!
For the Soaking Base
- Chana Dal (Bengal gram): 1 cup – This is the base that gives us that iconic crunch.
- Moong Dal (Split yellow gram): 1/3 cup – My mother-in-law’s secret trick! It keeps the inside beautifully soft and fluffy.
For the Masala Spice Paste
- Garlic: 5 cloves
- Ginger: 1 small knob
- Dried Red Chillies: 2 pieces
- Whole Spices: 1 clove, 1/2-inch cinnamon stick, 1 tsp coriander seeds, 1/2 tsp cumin seeds.
For the Final Mix & Aromatics
- Onion: 1/2, finely chopped
- Green Chillies: 1–2, finely chopped
- My Balanced Herb Trio: 2-3 tbsp Coriander leaves, 1-2 tbsp Mint leaves, 1-2 tbsp Dill leaves (This hits that perfect 1:0.5:0.5 ratio!)
- Turmeric Powder: 1/4 tsp
- Salt: To taste
- Oil: For deep frying (I prefer vegetable, canola, or peanut oil)
Step-by-Step Instructions
1. The Soak
I start by washing the chana dal and moong dal together thoroughly under cold water. Then, I leave them to soak in plenty of water.
💡 My Top Tip for Expats & Cooking outside India: If you are buying imported dals outside of India, the grains are often much drier and harder. While standard recipes suggest a quick 2-hour soak, I find that imported dal frequently needs 4 to 5 hours to hydrate properly.
How I test it: I take a single piece of soaked chana dal and pinch it between my index finger and thumbnail. If it snaps cleanly in half but still feels firm—retaining a slight “bite” right in the center—it is perfectly ready.
Once ready, I drain the dal completely in a colander and let it sit for about 10 minutes. You want absolutely no standing water left behind!
2. The First Spice Grind
In a dry mixer or food processor, I toss in the garlic, ginger, red chillies, clove, cinnamon, coriander seeds, and cumin seeds. I grind this into a coarse, incredibly aromatic spice base. Remember, do not add any water.
3. The Crucial Two-Step Dal Grind
This is where the magic happens, and it’s a two-part process that ensures the perfect consistency:
- The Binding Step: I throw just a tiny handful of the drained dal into the mixer with the ground spices and pulse a few times. This creates a small amount of smooth paste that acts as the “glue” to hold the vadas together.
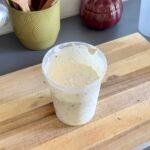
- The Texture Step: Next, I add the rest of the dal and pulse in very short, controlled bursts. I stop when the mixture looks like coarse wet sand, leaving plenty of whole and half pieces of chana dal visible.
Kitchen Prep Tip: I love that you can store this ground mixture in an airtight container in the fridge for up to 24 hours if you want to prep a day ahead!
4. Mix the Aromatics
I transfer my coarse batter into a large mixing bowl. Just before I’m ready to heat the oil, I add the chopped onions, green chillies, turmeric, salt, and my finely chopped herb trio (coriander, mint, and dill). I mix everything together thoroughly using my hands, which helps release the natural water from the onions and aromatic oils from the fresh leaves.
5. Shape and Deep Fry
I heat my frying oil in a deep pan over medium heat.
To shape them, I take a lemon-sized portion of the mixture, roll it gently into a ball, and place it right between my palms. I give it a firm, gentle squeeze to flatten it into an even disc with thin edges and a bulge in the middle.
I carefully slide the vada into the medium-hot oil. I let them fry for about 4–5 minutes, turning them over occasionally, until they turn a gorgeous, deep golden brown. Finally, I scoop them out with a slotted spoon and let them drain on a rack.
My Top Tips for Vada Success
- Master the Temperature: If your oil is screaming hot, the vadas will turn dark brown instantly on the outside while the inside stays raw and doughy. If the oil is too cool, they will absorb it like a sponge and get greasy. Keep your stove at a steady medium heat.
- Don’t Skimp on the Squeeze: When shaping, give the mixture a solid squeeze between your palms rather than just patting it. Packing the coarse dal tightly ensures it won’t break apart when it hits the hot oil.
Frequently Asked Questions (FAQs)
What makes this different from Mangalorean Chattambade?
While chattambade uses a very similar chana dal base and spice profile, this version introduces moong dal. That little addition completely changes the game, making the interior much softer, lighter, and fluffier instead of dense.
Why are my masala vadas breaking apart in the oil?
In my experience, this usually happens for two reasons: either your batter has too much hidden water, or the dal wasn’t pulsed enough to create that initial binding paste. Make sure you drain your dal thoroughly, and don’t skip the step where we grind a tiny handful of it into a paste first!
Can I air fry or bake these?
You absolutely can! While traditional deep frying gives the ultimate crunch, I’ve had great success in the air fryer. Preheat your air fryer to 180°C (350°F), brush the shaped vadas generously with a little oil, and air fry for 15–18 minutes, flipping them halfway through until they are golden.
What should I serve with Chana Dal Vada?
Like my mother-in-law, I highly recommend serving these alongside a hot bowl of rice and classic Dal Fry, or enjoying them as an afternoon treat with a steaming cup of my hot chai.
If you tried my mother-in-law’s recipe, I would love to hear how your version turned out! Leave a comment below—and definitely tag me on Instagram so I can see your gorgeous, crispy creation!
Masala Vada
Course: Snacks, AppetizersCuisine: South IndianDifficulty: Medium12-15
vadas3
hoursCrispy on the outside, light and fluffy on the inside. These golden lentil fritters are infused with a perfectly balanced blend of dill, mint, and warm whole spices, made with a traditional two-step coarse grind.
Ingredients
- To Soak
1 cup Chana Dal (Bengal gram)
1/3 cup Moong Dal (split yellow mung gram)
- For the Masala Paste (First Grind)
5 cloves Garlic
1 small knob Ginger
2 Dried Red Chillies
1 Clove
1/2 inch piece Cinnamon
1 tsp Coriander seeds
1/2 tsp Cumin seeds
- For the Vada Mix
1/2 Onion, finely chopped
1–2 Green Chillies, finely chopped
2 tbsp Coriander leaves, finely chopped (Ratio 1)
1 tbsp Mint leaves, finely chopped (Ratio 0.5)
1 tbsp Dill leaves, finely chopped (Ratio 0.5)
1/4 tsp Turmeric powder
Salt to taste
Oil for deep frying
Directions
- The Soaking & Snap Test
- Wash both Chana Dal and Moong Dal thoroughly.
- Soak them together in plenty of water.
- Note on Timing: While standard dal takes about 2 hours, imported dals (commonly found in Europe) can require 4 to 5 hours.
- The Trick: Pinch a piece of dal between your index finger and thumbnail. If it snaps easily but still retains a slight firmness (some bite) in the center, it is perfectly ready. Drain fully in a colander until there is absolutely no standing water.
- The First Grind (Spice Paste):
- In a mixer/grinder, add the garlic, ginger, red chillies, clove, cinnamon, coriander seeds, and cumin seeds.
- Grind into a coarse spice base without adding any water
- The Two-Step Dal Grind
- Add a tiny handful of the drained dal mix into the mixer with the spices and pulse to help bind them. Then, add the remaining dal. Pulse in short bursts.
- The final texture must resemble coarse wet sand with a few whole or half pieces of chana dal remaining.
- Do not over-grind into a smooth paste.
- Note: You can store this mixture in the fridge at this point if cooking later
- Mix the Aromatics
- Transfer the coarse mixture to a bowl.
- Just before frying, add the finely chopped onions, green chillies, turmeric, salt, and the herbs
- Mix everything together thoroughly using your hands.
- Shape and Fry
- Heat oil in a deep pan over medium heat.
- Take a lemon-sized portion of the mixture, place it between your palms, and squeeze gently to form a flat, even disc.
- Carefully slide it into the medium-hot oil.
- Fry on medium heat for a few minutes until beautifully golden brown and crunchy on the outside.
Recipe Video
Notes
- If the oil is too hot, the outside will brown instantly while the inside remains raw and pasty. Keep the heat strictly at medium so the core cooks through to a light, fluffy finish while the crust shatters perfectly when bit into.


Leave a Reply