I baked my own dream birthday cake and it was goooooooooooooooooooood
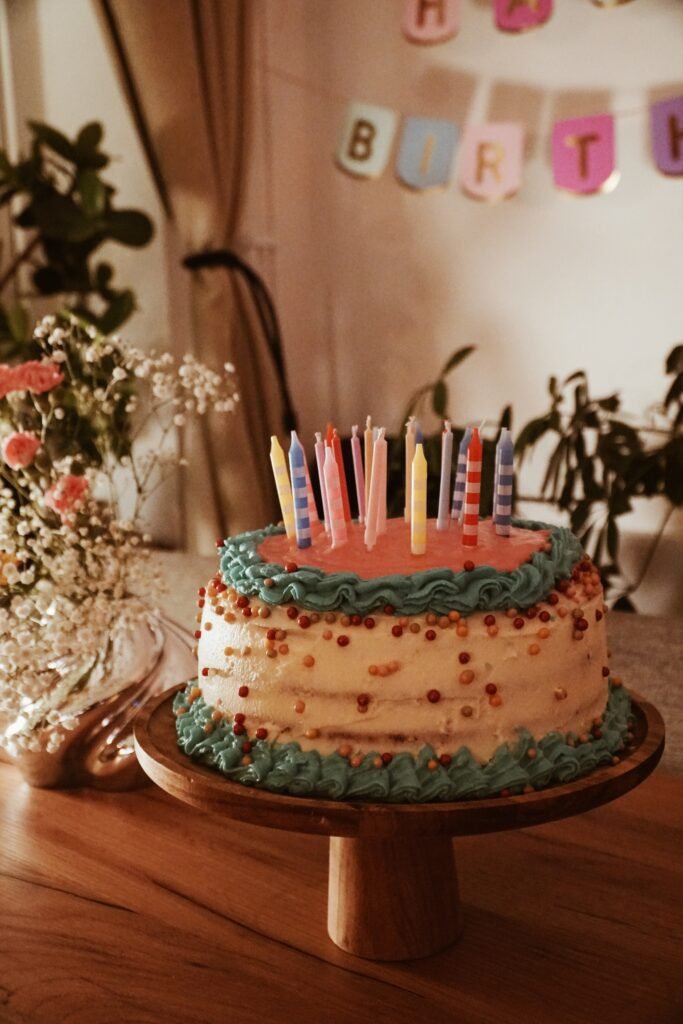
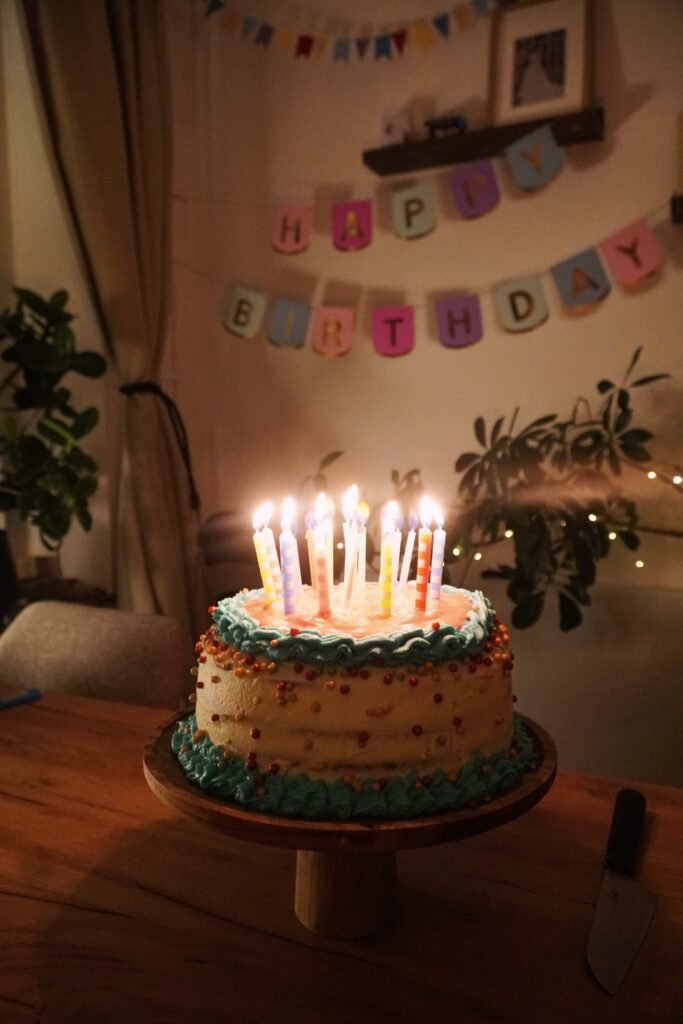
When my birthday was approaching, I knew I wanted to bake something extra special for myself. I was craving that nostalgic, retro 90s cake vibe – colourful piped borders, and alot of candles. Flavour-wise, I wanted a break from intense dark chocolate, but I still wanted warm, rich, caramely goodness without feeling heavy or being too sweet.
So, I built this cake around vanilla and brown sugar.
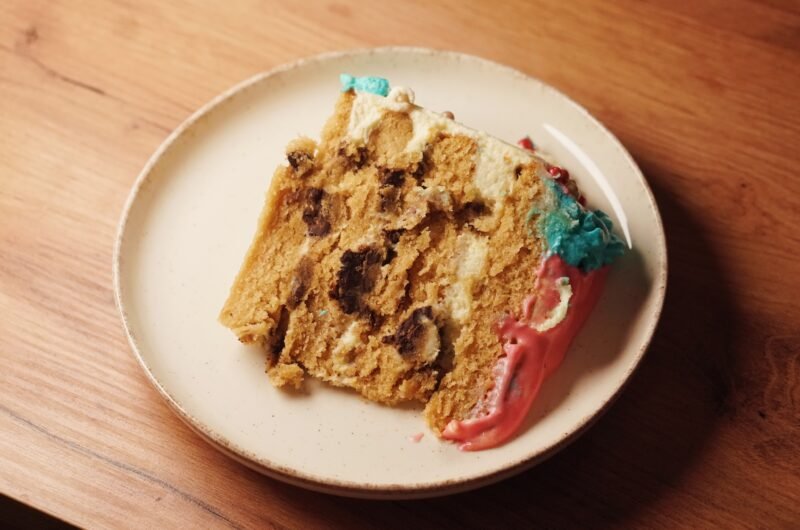
We’re talking four soft brown sugar vanilla sponge layers, stuffed with chunks of homemade brown butter chocolate chip cookies, held together by a light white chocolate vanilla mousse, and wrapped up in a silky Swiss meringue cream cheese buttercream.
I’m not going to lie: it takes some time to make. There are a few different components, and you’ll definitely fill up your sink with a few dishes. But trust me—when you take that first bite and taste all those textures working together, every single minute in the kitchen is 100% worth it.
Grab a cup of coffee, and let’s walk through how to make it together!
The Master Ingredient List
1. Brown Sugar Vanilla Bean Sponge
- 420g all-purpose flour
- 200g granulated white sugar
- 220g light brown sugar
- 2.5 tsp baking powder
- 1 tsp baking soda
- 1 tsp fine sea salt
- 250g crème fraîche (32% fat, room temperature)
- 4 large eggs (~200g whole eggs, room temperature)
- 240 ml neutral oil (rapeseed or sunflower oil)
- 1 tbsp vanilla bean paste
- 240 ml hot whole milk
2. Sheet-Pan Brown Butter Chocolate Chunk Cookie
- 128g unsalted butter
- 75g light brown sugar
- 51g granulated white sugar
- 75g whole egg (~1.5 large eggs, whisked and weighed)
- 1.1 tsp vanilla extract
- 188g all-purpose flour
- 1/2 tsp baking soda
- Pinch of fine sea salt
- 115g–150g dark chocolate chunks (50–70%)
3. White Chocolate Vanilla Mousse
- 1 sachet (~6.5g) Vegegel (OR 1.5 tsp powdered gelatin bloomed in 2 tbsp cold water)
- 2 tbsp cold water
- 300 ml heavy whipping cream (40% fat), divided (100 ml + 200 ml)
- 100g white chocolate, finely chopped
- 1.5 tsp vanilla bean paste
4. Swiss Meringue Cream Cheese Buttercream
- 4 large egg whites (~120g)
- 200g granulated white sugar
- 340g unsalted butter, softened to room temperature
- 200g full-fat block cream cheese, cold
- 1.5 tsp vanilla extract
- Pinch of fine sea salt
- Pink & Blue food coloring
Step-by-Step Instructions
Step 1: Sheet-Pan Brown Butter Cookie Squares
- Brown the Butter: Melt 128g butter in a saucepan over medium heat for 6–8 minutes. Let it bubble until golden brown specks appear at the bottom and it smells super nutty. Pour into a bowl, scrape all those delicious brown bits, and let cool for 15 minutes.
- Mix the Dough: Whisk the cooled brown butter, 75g brown sugar, and 51g white sugar. Whisk in 75g eggs and 1.1 tsp vanilla. Fold in 188g flour, 1/2 tsp baking soda, and a pinch of salt until combined. Gently fold in your chocolate chunks and nuts.
- Bake: Press the dough evenly into a lined 9×9 inch pan. Bake at 175°C (350°F) for 17–19 minutes until the edges are golden brown.
- Slice: Let it cool completely, then slice it up into neat 1 cm squares or small chunks.
Step 2: Brown Sugar Cake Layers
- Prep: Preheat your oven to 175°C (350°F). Line two 23 cm (9-inch) round cake tins with baking paper.
- Mix the Batter: Sift and whisk the dry ingredients together in a large bowl. In a second bowl, whisk the eggs, crème fraîche, oil, and vanilla until smooth. Fold the wet ingredients into the dry ingredients, then slowly whisk in the hot milk until you have a smooth, pourable batter.
- First Bake: Pour ~450g of batter into each tin. Bake for 22–26 minutes until a skewer inserted into the center comes out clean.
- Second Bake: Let the first two layers cool for 5–10 minutes, then unmold them onto a cooling rack. Re-line the tins with fresh baking paper, pour in the remaining batter (~450g each), and bake for 25–30 minutes.
- Cool: Let all four layers cool completely, then wrap them tightly in plastic wrap to keep them moist while you prep the fillings.
Step 3: Swiss Meringue Cream Cheese Buttercream
- Dissolve: Whisk egg whites and sugar in a heatproof bowl set over a pot of simmering water. Whisk constantly until the sugar completely dissolves and reaches 71°C (160°F), or feels totally smooth when rubbed between your fingers.
- Whip Meringue: Move the bowl to your stand mixer fitted with the whisk attachment. Whip on high speed for 8–10 minutes until stiff, glossy peaks form and the bowl cools to room temperature.
- Emulsify: Switch to the paddle attachment. Add your softened room-temp butter 1 tablespoon at a time on medium speed. Beat in the cold cream cheese in small cubes along with vanilla and a pinch of salt until smooth and silky. Beat on the lowest speed for 2 minutes to knock out any large air bubbles.
Step 4: White Chocolate Vanilla Mousse
- Activate: In a small saucepan, whisk Vegegel, 2 tbsp cold water, and 100 ml heavy cream. Bring to a gentle boil for 1 minute while stirring constantly. If using gelatin, put the gelatin with the warm cream and chocolate and not in the beginning like vegegel.
- Melt & Cool: Remove from heat, add the white chocolate and vanilla, and stir until completely melted and smooth. Let it cool until barely lukewarm (~35°C).
- Fold: Whip the remaining 200 ml cold heavy cream to soft peaks. Gently fold it into the chocolate mixture until smooth.
Assembly & Decorating Guide
          [ Top Cake Layer (Layer 4) ]
===================================================================
  White Chocolate Mousse + Brown Butter Cookie Chunks
===================================================================
          [ Cake Layer 3 ]
===================================================================
  White Chocolate Mousse + Brown Butter Cookie Chunks
===================================================================
          [ Cake Layer 2 ]
===================================================================
  White Chocolate Mousse + Brown Butter Cookie Chunks
===================================================================
          [ Bottom Cake Layer (Layer 1) ]
- Stack & Fill: Place your bottom cake layer on a board. Pipe a 1.5 cm high buttercream dam around the top outer rim (this keeps the mousse contained!). Spread one-third of the white chocolate mousse inside, then press in a layer of cookie squares. Repeat this process for Layer 2 and Layer 3, then top with Layer 4.
- Crumb Coat & Chill: Spread a thin layer of buttercream over the top and sides of the cake to lock in all the crumbs. Pop it in the fridge for 2–3 hours (or overnight) until firm to the touch. (If chilling overnight, let it set uncovered for a few hours first, then wrap gently with plastic wrap so it stays fresh).
- Final Base Coat: Coat the entire cake in a smooth, clean layer of plain white buttercream using an offset spatula and bench scraper. (If decorating the next day, let your leftover buttercream sit at room temp for 30 minutes to soften before piping).
- Two-Color Piping: Divide your remaining buttercream into two bowls. Tint one Pink and the other Blue. Fill two piping bags fitted with star or ruffle tips and go wild! Pipe shell borders, rosettes, swags, or fun freeform patterns all over the top and sides.
Frequently Asked Questions (FAQ)
Q: Can I make this cake ahead of time?
A: Absolutely! In fact, it tastes even better the next day after the flavors settle. You can bake the cookie sheet and cake layers and make the mousse a day in advance. Assemble and crumb coat the cake, then keep it wrapped in the fridge overnight. Decorate with your final frosting and colors on the day of your event!
Q: Why do I need a buttercream dam for the layers?
A: The buttercream dam acts like a physical barrier. Because the white chocolate mousse is light and soft, the dam prevents it from squeezing out the sides when you stack the weight of four cake layers on top.
Q: What if my Swiss Meringue Buttercream looks runny or curdled?
A: Don’t panic! This is a completely normal phase of making Swiss meringue buttercream. If it looks runny or liquidy, the butter was probably a little too warm. Just pop the bowl in the fridge for 15 minutes, then re-whip on medium-high speed—it will snap into a silky, smooth cream!
Q: What can I use instead of Vegegel?
A: If you don’t have Vegegel available, standard powdered gelatin or leaf gelatin works great. Use 1.5 tsp (approx. 4.5g) powdered gelatin bloomed in 2 tbsp cold water, then melt it into the warm cream and white chocolate mixture.
Q: How should I serve this cake?
A: Always pull the cake out of the fridge 30 to 45 minutes before serving. Because Swiss Meringue Cream Cheese Buttercream is made with real butter, letting it come to room temperature allows the frosting and sponge layers to soften into a melty, velvety texture!
Brown Sugar Vanilla Cake with Brown Butter Cookie Chunks & White Chocolate Mousse
Course: DessertDifficulty: Hard10-14
servings3-4
hours8
hoursIngredients
- Brown Sugar Vanilla Bean Sponge
420g all-purpose flour
200g granulated white sugar
220g light brown sugar
2.5 tsp baking powder
1 tsp baking soda
1 tsp fine sea salt
250g crème fraîche (32% fat, room temperature)
4 large eggs (~200g whole eggs, room temperature)
240 ml neutral oil (rapeseed/sunflower oil)
1 tbsp vanilla bean paste
240 ml hot whole milk
- Brown Butter Chocolate Chunk Cookies
128g unsalted butter
75g light brown sugar
51g granulated white sugar
1.5 large eggs (75g whole egg, whisked and weighed)
1.1 tsp vanilla extract
188g all-purpose flour
1/2 tsp baking soda
pinch of fine sea salt (~3/8 tsp)
115g–150g dark chocolate chunks (50–70%)
- White Chocolate Vanilla Mousse
1 sachet (~6.5g) Vegegel (OR 1.5 tsp / 4.5g powdered gelatin bloomed in 2 tbsp water)
2 tbsp cold water
300 ml heavy whipping cream (40% fat), divided (100 ml + 200 ml)
100g white chocolate, finely chopped
1.5 tsp vanilla bean paste
- Swiss Meringue Cream Cheese Buttercream
4 large egg whites (~120g)
200g granulated white sugar
340g unsalted butter, softened to room temperature
200g full-fat block cream cheese, cold
1.5 tsp vanilla extract
Pinch of fine sea salt
Food coloring (Pink & Blue) (optional)
Directions
- Step 1: Sheet-Pan Brown Butter Cookie Squares
- Brown Butter: Melt 128g butter in a saucepan over medium heat for 6–8 minutes until golden brown specks appear and it smells nutty. Pour into a bowl, scraping the brown bits, and cool for 15 minutes.
- Mix: Whisk cooled brown butter, 75g brown sugar, and 51g white sugar. Whisk in 75g eggs and 1.1 tsp vanilla. Fold in 188g flour, 1/2 tsp baking soda, and pinch of salt until combined. Fold in chocolate chunks and nuts.
- Bake: Press dough into a lined 9×9 inch pan. Bake at 175°C (350°F) for 17-19 minutes until golden on edges.
- Slice: Cool completely, then cut into neat 1 cm squares or small chunks
- Step 2: Brown Sugar Cake Layers
- Prep: Preheat oven to 175°C (350°F). Line two 23 cm round tins with baking paper.
- Batter: Whisk dry ingredients together in a large bowl. In a second bowl, whisk eggs, crème fraîche, oil, and vanilla. Fold wet into dry, then gradually whisk in hot milk until smooth.
- Bake: Pour ~450g of batter per tin. Bake for 22–26 minutes until a skewer inserted in the center comes out clean.
- Once the first two layers come out, let it cool for 5-10 minutes and then unmould the cake out onto a cooling rack. Re-line the tins with fresh baking paper, pour in the remaining batter equally ~450g each, and bake for 25–30 minutes. Let all four layers cool completely and cover tightly with plastic wrap.
- Step 3: Swiss Meringue Cream Cheese Buttercream
- Dissolve: Whisk egg whites and sugar over a pot of simmering water until sugar dissolves completely and reaches 71°C (160°F) or feels smooth when rubbed between fingers.
- Whip Meringue: Transfer to stand mixer with whisk attachment. Whip on high speed for 8–10 minutes until stiff, glossy, and the bowl cools to room temperature.
- Emulsify: Switch to paddle attachment. Add room-temp butter 1 tablespoon at a time on medium speed. Beat in cold cream cheese in small cubes along with vanilla and salt until smooth and silky. Beat on lowest speed for 2 minutes to remove air bubbles.
- Step 4: White Chocolate Vanilla Mousse
- Activate: In a small saucepan, whisk Vegegel, 2 tbsp cold water, and 100 ml heavy cream. Bring to a gentle boil for 1 minute while stirring.
- Melt & Cool: Remove from heat, stir in white chocolate and vanilla until smooth. Cool until barely lukewarm (~35°C).
- Fold: Whip remaining 200 ml cold heavy cream to soft peaks. Gently fold into chocolate mixture.
- Assembly & Decorating Guide
- Layer 1 Assembly: Place bottom cake layer on a board. Pipe a 1.5 cm high buttercream dam around the top rim. Spread half the white chocolate mousse inside, and press in a layer of cookie squares.
- Repeat the process for layer 2, layer 3, and the top layer.
- Crumb Coat & Chill: Apply a thin layer of buttercream over the top and sides. Chill in the fridge for 2-3 hours or overnight until firm to the touch. If overnight, after a few hours uncovered in the fridge, cover with plastic wrap so it doesn’t dry out.
- Final Base Frosting: Coat the entire cake in smooth, plain white buttercream using an offset spatula and bench scraper. If frosting the next day, keep the buttercream out at room temperature for 30 minutes before frosting.
- Two-Color Piping: Divide remaining buttercream into two bowls. Tint one bowl Pink and the other Blue. Fit two piping bags with star or ruffle tips and pipe decorative accents, borders, rosettes, or freeform patterns across the top and sides of the cake.
Recipe Video
Notes
- Equipment:
2 x 23 cm round cake tins (or 4 total)
1 x 8×8 inch metal baking tray
Stand mixer or electric hand mixer
Piping bags & Star Piping Tips
Candy thermometer & bench scraper








Leave a Reply